Monday 28 November 2022

SALE ITEMS - Having a Bit of a Clear-Out (Part One)

I have decided that I have far too much stuff and most of it hasn't seen the light of day for a long time. So it's time to concentrate on a few of my favourite projects and add to them and at the same time get rid of some stuff that I will never use. 

£18.00 inc postage UK only

£25.00 inc postage UK only

£25.00 inc postage UK only

£15.00 inc postage UK only

£15.00 inc postage UK only

£12.00 inc postage UK only

£12.00 inc postage UK only

£12.00 inc postage UK only

£12.00 inc postage UK only

£12.00 inc postage UK only

£30.00 inc postage UK only

£30.00 inc postage UK only

If you are interested in any of the above please email me at coldwarcommanders93@gmail.com


Tuesday 18 October 2022

BAG OF BITS - The Carrier Bag Project (Part Two)

So in between commission work and painting figures for Steel Lard in November, at which myself and my good friend Richard C are running a Sharp Practice game set in Riga in 1812, I have started on the Bag of Bits I bought at Penkridge for the princely sum of £3.00. 

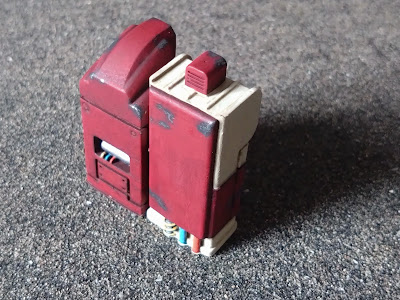
After a good sort through I found several bits of Necron Warriors in various states of repair! From the bits I managed to make two complete miniatures. Now I haven't played WH40K since the original Rogue Trader, however Richard C recently introduced me to Rogue Stars, one of the Blue Books from Osprey, a great little Sci-Fi skirmish game which is ideal for utilising all sorts of miniatures. So these two chaps will be added to the Rogue Stars collection. 


Tuesday 20 September 2022

BAG OF BITS - The Carrier Bag Project (Part One)

On Sunday I headed over to the Penkridge Wargames Tabletop Sale. I had booked a couple of tables to get rid of some stuff that I've accumulated over the years and that I don't think I will be using now that I have opened The Unit. Most of my projects are related to future games etc. Had a really good morning and sold a load of stuff but as I was so busy I didn't really get chance to have a good rummage through all the stalls. I did pick up some 28mm terrain pieces for future games at The Unit and I'll post more information on those later this week. However one thing I did spot was a carrier bag on the stall opposite with a label saying 'Bag of Bits'! So when I had a minute I popped over to have a look but didn't get long as a customer at my stall appeared. What I did see where a few bits that looked interesting including some Warhammer Bretonnian horses which are always useful for Italian Wars etc. So after some hard haggling I managed to get the chap down to £3.00 from £5.00. Result! So today I have had a chance to have a look at what I have ended up with and I have to say I am rather pleased. Aswell as the horses there were quite a few 28mm plastic Landsknechts, 28mm skeletons and enough figures to make three groups for Rogue Stars. 

So I thought it might be interesting to document my progress through the carrier bag and see what I can create.  


Saturday 6 August 2022

SHARP PRACTICE II - ACW Somewhere Down the Crazy River

On Saturday 23rd July I headed back over the Peak District to my good friend Richard C's house in Storrs for a game of Sharp Practice 2. Followers of Richards' http://thelandofcounterpane.blogspot.com/ will no doubt have seen his recent work on converting some Perry ACW figures to represent the Mississippi Marine Brigade and for this scenario I was going to take on the role of Captain Daniel R Rosebush in charge of a unit from the Mississippi Marine Brigade tasked with thwarting Confederate operations along the river.

Union Briefing 

It is May 1863 and for nearly 12 months the Union has been unable to establish complete control over the Mississippi River. While the Confederates continue to hold the fortified heights at Vicksburg, the Union plan to cut the Confederacy in half remains incomplete. Despite patrolling by Union gunships, vital supplies from the West continue to cross the mighty river. However, difficulties in coordinating cross-river and overland traffic mean that supplies often wait in riverside warehouses and barns while onward transport is arranged. These temporary stashes of supplies represent targets of opportunity for the Mississippi Marine Brigade. It is believed that Confederate smugglers have been moving supplies across the river near Hackspit, Mississippi. A Marine Brigade unit under Captain Daniel R Rosebush is ordered to identify and destroy any supplies in the area. Union Deployment Between towns the river bank is pretty featureless. It’s not easy to be sure exactly where you are coming ashore. As a result you will roll a d6 to determine the location of your Deployment Point. The levee at Hackspit is steep-sided, impassible to mounted cavalry and an obstacle to deploying your artillery. When the artillery Leader’s card comes up they may be deployed as usual in contact with the Deployment Point but only if a non-artillery Group has previously had its chance to deploy onto the table and not done so (simply state that the Group in question are “assisting their colleagues”). The assisting Group may deploy as normal when its Leader’s card is drawn again after the artillery has deployed. 

Union Forces 

Capt D R Rosebush (Level III Leader) Blue 1 with Musician, Physic, Spirits & Tinderbox 2 Groups of Union infantry 1 Group of Union skirmishers 

Sergeant Walter Jones (Level I Leader) Blue 2 with 1 Group of dismounted cavalry 

Sergeant Wade Deeply (Level I Leader) Blue 3 with 1 Group of artillery

Ron took charge of the Confederate forces in the area as Sergeant Salmon A Wartner with a couple of units of Confederate infantry plus a large unit of cavalry that eventually arrived later in the game.

As I was slightly hampered by the fact that I was required to keep one Group of non-artillery troops off-table until they had used up an activation helping the artillery into position I decided to initially deploy a unit of skirmishers and push them up the Union right.

Sgt Jones and the dismounted cavalry were sent out on the Union left to take position on the edge of a small wood with a clear field of fire to the barn. 

Capt D R Rosebush  deploys on to the table with his drummer and physic.

View from the levee showing the two skirmisher units pushing out to the left and the right flanks.

Eventually I managed to get Sgt Wade Deeply and his artillery deployed along with the remaining two units of the Mississippi Marine Brigade. 

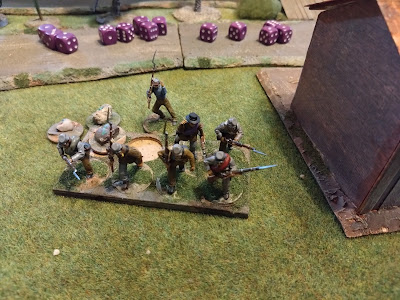
Confederate infantry move out from behind the barn and fire upon the Union skirmishers.

Another unit of Confederate infantry move out from behind the barn and start to fire on the Union dismounted Cavalry.

Luckily I had managed to get them into the woods before they were fired upon.

Return fire from both my skirmisher units start to cause casualties and also quite a lot of shock!

The Confederates were now coming under fire from all directions with the main infantry group and the artillery joining in.

After forcing the Confederate infantry on my right flank to retreat I immediately pushed the skirmisher unit towards the objective, the barn housing the supplies.

The artillery continued to lay down fire on the other Confederate infantry unit to the left of the barn.

It was at this point that a Confederate cavalry force that were in the area decided to put in an appearance and they immediately charged my main body of infantry. 

Despite causing a few casualties and some shock the cavalry came thundering onwards!

It wasn't looking good for the Mississippi Marine Brigade! One bit of luck saw a random event roll for the Confederates result in the barn containing the supplies catching fire! 

Slowly with continued fire from the skirmishers and the artillery I had begun to reduce the Confederates force morale but with the cavalry charging towards my main force I decided to try and take the Confederate deployment point and reduce their force morale even further.

As expected the cavalry charged forced my main infantry force back up the steep banks of the levee. Luckily the cavalry were unable to pursue. As you can see I had managed to inflict quite a few casualties on the cavalry but not enough to stop their charge.

As the Confederate cavalry tried to re-organise themselves at the foot of the levee my skirmishers continued to inflict casualties and shock on the two Confederate infantry units as well achieving hits on leaders further reducing the Confederate force morale.

A chapter end saw the roof collapse destroying the Confederate supplies within and my skirmishers, accompanied by Capt Daniel R Rosebush himself, were successful in capturing the deployment point.

At this point, with the Confederate force morale at 1 and the Union still on 7 Ron took the decision to retreat his remaining forces. A successful mission for the Mississippi Marine Brigade, although when the Confederate cavalry arrived I did fear the worst, but both skirmisher units proved invaluable in putting sustained fire on the Confederates throughout the game. 

Great game and I look forward to playing some more ACW Sharp Practice.


Saturday 1 January 2022

CHRISTMAS GAME - Battle of the White Meadows 576AD

A regular highlight of the festive period is the annual trip over the Peak District to the small village of Storrs near Sheffield to visit my good friend Richard C and enjoy a days wargaming. 

This year there were two days organised. One of the 27th December which was a Hordes of the Things game which unfortunately I couldn't attend due to being on Grandad duty. The second was arranged for the 29th December which was a To the Strongest 6mm Ancients game. So after a very murky drive over the Peak District I arrived in Storrs and the scene was set for the Last Campaign of Khosrau I in Andreivia* 576AD. 

* Andreivia is a fictional Black Sea country which features in many of our games and campaigns from Ancient to Modern times.

This game was originally planned to be part of Crisis Point but due to the Pandemic this was the first opportunity to get together and play. The scenario and figures were done by Jamie C.

History.

The Roman and Persian Empires have spent the last century running through a cycle of concealed and then public aggression. Client States (mostly in Arabia and the Caucasus) are manipulated into proxy wars and border disputes, until the conflict becomes too intense and one empire dispatches armies to the region. Brief war follows and no real gains are made before a truce is declared and the cycle begins again. 

The current war is in it's fourth year, and has severely deviated from the pattern. Rome betrayed its Arabian allies and, despite winning in the Caucasus, has lost Mesopotamia, Syria and Eastern Anatolia. In the latest campaign however, Khosrau I, Shahansha of Persia, has led an army to Meilitine and been defeated by a Roman force commanded by Justinian, Magister Militum for the East. A second battle saw the Persian camp captured by the Romans and the Persians flee across the Tigris. They have since turned north into the small Roman-aligned kingdom of Andreivia, and King Damnazes has called for Roman aid. He intends to meet the invaders on the Leukos Libadion, Andreivia's white-stoned southern plains...

Will the upcoming Battle of White Meadows be remembered as the shining pinnacle of local resistance to foreign tyranny, or the moment where the flower of early medieval Andreivia was crushed under the Iranian boot...

Forces.

The defenders of Andreivia consisted of a Byzantine army supported by Ghassanid allies and an Andreivian force.


Opposing them across the White Meadows were the invading forces of the Persians and their allies.


Battle.

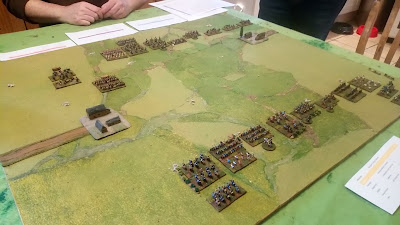
Initial deployment saw the Sassanids (closest to the camera) deploy in the centre with the Albanians and Lakhmids both deploying on the right flank. Opposing them were the Byzantine/Romans in the centre with the Andreivian forces on their left flanks and the Ghasssanids to their right. The road sections and villages were rough terrain so would form a small obstacle on each flank.

The Sassanids, with myself playing the role of Khosrau I, with their heavy cavalry on their left flanks and two deep units of Paighan spearmen in the centre supported by a unit of light infantry archers. On the Sassanid right flank were two units of light cavalry archers.

Unfortunately I lost track of the order of these photos as I was importing them and once the forces clashed it was quite difficult to keep track of what the other units were doing. I will try and add details when and where I can remember them.

I started by pushing my Savaran Cavalry forward on the left flank and made a bold move forward on my right flank with my Horse Archers. Meanwhile in the centre the Paighan advanced slowly forward accompanied by the Foot Archers and Khosrau I himself. Unfortunately my Cataphracts failed to activate and remained in their start position.

Closer view of the Savaran Cavalry and the Paighan as they begin their steady advance.

The Sassanid Horse Archers (bottom right) approach the Byzantine line.


Lovely 6mm Baccus miniatures from Jamie C's collection.

The Byzantine line crashes into the Sassanid Horse Archers. 

Meanwhile on the right flank the Albanians and Lakhmids commanded by my partner in crime Gus began to advance towards the small farm. Opposed by a force of Andreivians.

Sassanid Savaran Cavalry approach the Ghassanid Spearmen.


The Sassanid Cataphracts still unable to move due to being disordered. They would remain like this for a few turns until the assistance of Khosrau I himself finally rallied them and they could enter the battle.

Khosrau I rallying the Sassanid Cataphracts.

Ghassanid Light Infantry occupy the farm supported by Ghassanid Cavalry (just behind the farm) threaten the flank of the Savaran Cavalry forcing them to check their advance.

Lakhmid and Albanian forces clash with Andreivians on the right flank.

In the centre the Paighan clash with Byzantine Cavalry.


The Byzantines destroy one unit of Paighan and push forward on the Sassanid left flank. Bottom right the Savaran Cavalry move to support.

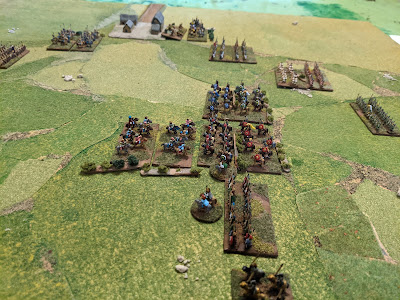
Ghassanid Cavalry attempt to outflank the Sassanid left as the Sassanid Cataphracts finally get into the battle with a decisive move to plug the gap in the line left by the destroyed unit of Paighan.

Close up of the Ghassanid Cavalry beginning to outflank the Sassanid left. Would this move come too late as the Byzantine forces in the centre begin to weaken under pressure from both the Sassanids and the Albanians.

The battle rages in the centre.

Albanian and Lakhmid forces begin to encircle the Andreivians/Byzantines on the right.

The beginning of the end for the defenders of Andreivia and Albanian/Lakhmid pressure continues to bear down on their beleaguered left flank.

Ultimately the Sassanids and their Allies were victorious due largely to some terrible chit pulls from Richard C playing the Byzantines. A great game as always and many thanks to Jamie C for organising the game and Richard C for his wonderful hospitality including home made soup, crusty bread and cheese. What's not to like! Thanks again to all the players for a great afternoons gaming. Hopefully it won't be long before I head over the Peak District again for a Saturday Afternoon game. 

HAPPY NEW YEAR! 


Some more photos of the battle taken by Jamie C who umpired the game.